Ship Manoeuvring
Proper procedures for anchoring and mooring
Clearing
anchors after a sea passage:
At the end of a sea passage, the anchor lashings are
removed. The cement and canvas over the spurling pipes are removed and so are
the metal covers,
Once the anchor is solely on
the bow stopper and the brake the anchor is said to have been cleared away
ready for use. In regard to the above – all loose material around
the spurling pipe and hawse pipe is cleared away since while anchoring these
cement or other pieces would fly off as dangerous missiles.
Executing
the anchorage plan
Check as far in advance as possible that the berth and
the planned approach to it are clear. Plot the anchored ships to confirm this.
Keep a constant check on the speed required to meet
the ETA.
Allow additional leeway for cross wind and tidal
streams as the speed of the ship is reduced, in order to make good the correct
line of approach. This particularly necessary in heavy ships,
which may have to reduce speed early in the approach.
As a general rule, try to anchor with the wind or
tidal stream (whichever is the stronger) slightly on the bow.
Normally plan to use the weather anchor. It is sometimes better to use the lee anchor
in places where the stream is so strong that the ship lies more easily to the
lee anchor. The lee anchor may be used
when the wind is across the stream, otherwise the ship may fall across the
weather anchor in the process of getting her cable, thus causing dragging. If other ships are already at anchor, it is
usually possible, by observing their cable, to see which is
the better anchor to use.
If anchoring with the wind abeam, it is often a good
plan to cant the bow into the wind using maximum rudder just before reaching
the anchorage position.
The anchor and the amount of cable to be used are
normally planned beforehand. Be prepared
to adjust both of these depending on the conditions encountered.
When on course for the anchorage, it is usually better
to give the Quartermaster the course to steer rather than to give him con
degrees. This leaves more time for
observing marks, ships, etc.
Information which is required:
Depth of water.
Nature of the bottom.
State of the tide on
anchoring.
Rise and fall of the tide
during the intended stay.
Tidal stream on anchoring.
Forecast and actual wind and
relative direction on anchoring.
Recommended anchor and scope
of cable.
Pilot station and their
distance from the ship.
Fix the ship on letting go the anchor-take beam
bearings first for accuracy—obtain a sounding and note the ship’s head and
time. The sounding provides a check that
sufficient cable is being used.
As the way is taken off the ship, the Navigating
Officer must observe what the ship is doing, either by beam bearings or by
objects in transit, and report this to the Captain.
Anchor
preparatory positions:
Prior arriving at the anchorage the anchoring crew
would go forward and after the usual checks would report to Bridge. And once
the order is received to prepare the anchor, the crew would continue to do so.
The order may be to keep the anchor ready from the
hawse pipe – used generally by pilots when unsure whether anchoring will be
required or not.
In this case the duty officer forward is supposed to
take the anchor on gear and walk back the anchor just slightly from the stowed
position and then again clamp the brake and release the gear. This ensures that
the anchor will go down once the brake is released.
If the order is to keep the anchor ready out side the
hawse pipe then the anchor is taken on the gear and walk backed just outside
the hawse pipe and then the brake is tightened and the gear released.
If the order is to keep the anchor in the ‘cock a
bill’ position then the anchor is to be walked back to the water level and kept
ready on the brake.
All lowering is to be done under power and never an
attempt is to be made by releasing the brake without engaging the gear of the
windlass.
‘Brought up’
In fair weather and light sea conditions:
The chain after having been paid out to its required
length and then held is expected to have anchored the ship.
The duty officer forward checks up on the cable – on
constant watching of the chain – it may be seen that the chain may have been at
medium stay and then after sometime (usually 5-10miutes) comes to short stay
and remains there.
Even for a final long stay, the brought up condition
would be a medium stay unless the weather is rough when it may be between long
and medium stay.
However if watching the cable for a further period of
5 – 7 minutes it is noticed to grow again, then a further period of observation
is required to see whether it comes to short stay or not.
If it stays at medium stay then it is said to be
‘brought up’ but if the cable alternates between short and medium or between
medium and long rapidly then it is certain that the anchor is not holding.
What happens is that the ship strains on the cable and
it stretches, if the anchor holds then the ship is slowly pulled in towards the
cable, else the anchor suddenly loses its hold and rapidly moves towards the ship
– above water we would see the cable stretch and then suddenly come to short
stay.
Bridge:
Whether or not the ship is dragging may be confirmed
by selecting a pair of fixed objects on the beam and in transit. Such objects need not be charted. The safest method of discovering whether or
not the ship is dragging is to fix by sextant angles or compass bearings. The fixes of the position of the bridge
should always lie within the bridge swinging circle drawn for the length of
cable veered. As mentioned earlier, if
they fall outside the ship is dragging.
Signals after anchoring
Once the vessel has ‘let go’ of her anchor the anchor
ball by day and the forward and aft anchor lights by night should be switched
on.
The navigation lights are switched off. Some ships are
provided with a station light forward, this may be switched on – provided that
this does not interfere with navigation.
Once the ship is brought up, all the deck lights are
switched on.
Anchoring
in deep water
Cable must be veered before letting go. The maximum safe speed of with cable veered
is limited, most ships should stop and take all their
way off, before veering cable.
For a larger ship anchoring in deep water is a new
concept of anchoring. It may be possible to veer the cable and then let go, but
in greater depths it may be prudent to walk back on the anchor cable until the
anchor is about to have reached the bottom. The anchor should then be taken on
the brake and the gear withdrawn and the anchor let go. This in the long run
would reduce the undue strain on the windlass system.
The holding ground is often poor. The depth of water is such that the standard
rules for the amount of cable cannot be used-for example, anchoring in 110
metres requires at least 13.5 to 14 shackles. A ship with, say, 9 shackles of
cable available will only be able to put about 4 shackles on the bottom in 110
metres of water. Thus, the holding power
of the anchor will be considerably reduced, perhaps by as much as 60% to 70%,
and account of this must be taken.
Having found a suitable position, the ship should
approach it at as slow a speed as effective steerage way will allow. Several shackles of cable may have to be
veered before letting go.
Different methods of anchoring
It is easier to anchor in the exact berth if steerage
way can be maintained up to the moment of anchoring.
Anchoring with headway and laying out the cable under
the ship is known as the running
anchorage.
When anchoring with headway, the speed when, letting
go should not be more than 2 to 3 knots over the ground. Too high a speed may strain or even part the
cable, while too low a speed will prolong the operation unduly.
The alternative to anchoring with headway is to stop
in the berth or just beyond it and then, having let go the anchor, go astern
laying out the cable. This is known as
the dropping anchorage; it is usually
adopted by all vessels, this method may well be more seamanlike than the
running anchorage.
The
advantages of the dropping anchorage over the running anchorage are:
The cable is laid out downwind and/or downstream (the
running method being into the wind and/or stream). This is the best direction for modern anchors
and cables, and there is less risk of damage to the protective bottom composition
and underwater fittings.
There is less risk of tumbling or slewing the anchor
as the ship lays back on the wind and/or stream after letting go.
There is less likelihood of dragging after letting go
through premature snubbing by the officer forward.
There is less wear on the hawse pipe and cable, and
less chance of damage, since the cable does not turn so sharply at the bottom
of the hawse pipe while it is being laid out.
The ship is ‘brought up’ more quickly.
The
disadvantages of the dropping anchorage as compared to the running anchorage
are:
Ship handling is compromised in the final stages
because way is taken off the ship in the last part of the approach.
The cable is not laid out in a bight and so cannot
absorb the strain gradually as the ship falls back on her cable.
The final moments of anchoring take longer.
Securing of anchors after anchoring
Once the ship has been ‘brought up’ and is riding to
the anchor, the bow stopper is lowered and the securing pin placed, the brake
is slackened a little to make the chain sit properly into position on the bow
stopper, and then is tightened full.
If the bow stopper cannot be fitted then the brake is
tightened full and a marker flag is tied to a link, should be visible from the
bridge (maybe through binoculars), to keep a check on the chain.
The hawse pipe covers are placed into their respective
slots, to prevent any unauthorized entry. However if the holding ground is not
good or if the weather is rough then it is best not to put the hawse pipe
cover, so because any movement of the chain would damage the covers and they
may get stuck in their slots thus causing delay in their removal once the time
arrives for heaving up.
Preparing to heave up and anchor cable markings
Once the crew arrives at stations forward, the power
on the windlass is to be checked.
The anchor wash water is started.
The water under the flare around the chain should be
checked for any foul up or any fishing vessels tied to the chain.
The windlass and the deck around should be checked for
any unusual damages.
The hawse pipe cover removed and the spurling pipe
checked for any obstruction.
The direction and the strain on the chain should be
reported to the Bridge.
The windlass should be in the proper gear (anchor lift
position/ double) and the weight is to be taken, and the bow stopper removed.
The brake is to be released slowly - in case the chain starts slipping the
brake is to be put back again.
Now the anchor is ready for heaving up, the chain
being controlled by the windlass alone. Once the order is received to heave up
the windlass is operated and the chain lifted up.
The duty officer constantly looks over the side from
the observation platform, he also checks up on the
movement of the chain on deck and should be aware to the voice of the crew on
deck.
At night the torch is used to good effect and in
general the signal is to wave the torch in circular motion for heaving up and
if the torch becomes stationary to awast heaving.
If there is too much mud on the chain then the chain
is picked up slowly to allow the anchor wash to wash down the chain.
The duty officer constantly reports the direction and
the strain on the chain as well as any other observations that he or the crew
may detect. The duty officer should check each joining shackle on deck as it is
brought up – include lead blocks as well as any clearance detected between the
parts of the shackle.
If time permits then the other crew is called upon to
clean and paint the cable markings.
The carpenter checks to see the main marking of
seizing wire – if damaged he replaces them.
The first half length of the chain immediately after
the anchor is not counted. The next joining shackle after this is called the 1st
shackle. The links immediately forward and aft of this joining shackle is
marked with a piece of canves being wound around the
stud of the link and fastened with seizing wire. Both the links are painted
white and the joining shackle red.
The next joining shackle is called 2nd
shackle. Here the mark is on the 2nd link before and after the
joining shackle and the same treatment is done to only the 2nd links
(forward and aft of the joining shackle). The paint is however applied to 1st
as well as the 2nd links forward and aft of the joining shackle. The shackle again being painted red.
Same with the 3rd shackle and so on.
AT the tenth shackle the while paint extends for quite
some distance. Since there are 10 links on either side of the joing shackle to be painted. The mark thjough
is only on the 10th link forwars and aft.
If the marks have been done at a dry dock then a stainless steel broad ring is
placed on the stud – instead of the canvas and seizing wire.
The report to the bridge may be like –
3 shackles on deck – cable leading 2 points on the bow
–medium stay - moderate weight, cable coming up easily, no
mud.
3 shackles on deck – cable leading across the bow - 2
points on the port bow (if the anchor is the starboard one) – long stay –
weight on the cable, cable not coming up easily, no
mud.
3 shackles on deck – cable up and down, cable coming
up easily, thick mud – have to slow down to wash.
3 shackles on deck – cable leading 2 points on the bow
– very long stay – excessive weight, cable not coming up, no
mud.
As the shackles come in, in addition to the reporting
by the duty officer, the carpenter also rings the bell according to the number
of the shackle – so with 3 shackles on deck he gives three distinct rings on
the bell.
Once the anchor is aweigh the duty officer so reports
and the carpenter rings a moderate continuous ring.
Securing anchors and preparing anchors for sea
Once the anchor has been washed the anchor is hove
right up into the hawse pipe, the bow stopper is lowered and the locking pin
inserted.
The winch is reversed a little to make the chain sit
properly into the slot of the bow stopper and then the brake is tightened and
the windlass gear removed.
The anchor chain at the deck level (hawse pipe) is
lashed with extra lashings as provided by the shipyard, if none are present or
if expecting heavy weather, then extra wire rope lashings are taken, The wire
rope to be used should be tested one, if an old (good condition) life boat
falls are available then this makes a very good extra lashing wire. This wire
is flexible and can be used by hand. A number of turns (figure of eight) are
taken around two sets of bitts. The free ends being fastened by bull dog clips
at least two fixed in opposite directions.
Generally the shipyard would have provide
lashing point as well as short length of wire attached to a bottle screw. These
should be well oiled and are the most efficient for lashing the anchor. The
wire should be tight.
Once the anchor is lashed the hawse pipe covers are
not placed but stowed under deck or in their stowage positions.
The spurling pipe area is chipped to remove any
residual remains of earlier cement.
The metal spurling pipe covers are placed around the
chain and over the spurling pile. The clips provided at the edges of the covers
should be hooked to the lips of the spurling pipe.
A new canvas cover is then placed over the metal
covers just fitted and is tied around the lips of the spurling pipe as well as
the chain. No empty spaces should be found.
Cement mixture is prepared and the entire cover is
covered with this mixture.
Preparations for berthing alongside
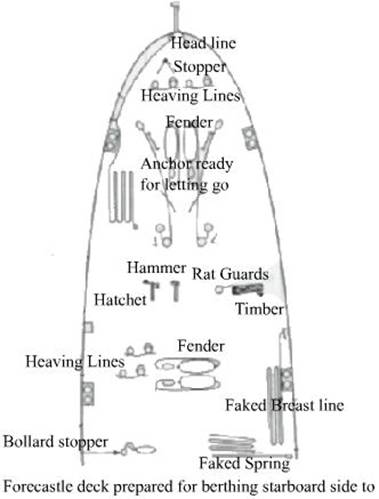
Prior berthing a ship, the mooring ropes have to be arranged faked down as required. If the ropes are on barrels of the winches then they have to be examined for any wear and tear. The wires if any have to be similarly checked. The tonsburg shackles attaching the wire to the rope tails are also to be inspected.
Once the inspections are over, the ropes are faked out
as required – and adequate length is faked so that the crew can easily pass the
lines when required.
Messenger ropes at least 2 of them and at least 2
heaving lines are to be arranged on the deck.
All the winches are to be inspected for any brake
lining damage and if hydraulic then any leakage and the tank levels.
The winches have to be tried out.
If the vessel requires portable fenders then the same
should be rigged at the most vulnerable points and then raised
up.
Large fenders are to be rigged at the break of the
forecastle deck and at the break of the accommodation.
No overside projections are allowed as such all
ladders and gangways are to be swung inside.
Equipment as shown in the figure are
to be ready at about the places shown.
Use of head ropes, stern ropes, breast ropes and springs
Head ropes are the first ropes that are sent from the
ship. Only in very few ports would any other line be passed as the first line.
The headline once passed fixes the ships head to a
point and then either a tug or the tide/ current is used to bring the ship
alongside.
The spring line is sent second, the work of this line
is to hold the ship in position. This line does not allow the ship to surge
forward, due to the action of the heaving headline.
Headlines and spring lines are generally all that is
required to hold a ship in position and alongside.
However it sometimes becomes necessary to send out
breast lines to keep the ship alongside. Note however that if the breast line
is not at 90° to the
ship the effectiveness of its usefulness is lost.
Stern ropes are sent after the forward headlines and
spring and serve the same purpose as that of the headline only in the opposite
way.
While heaving to keep the ship alongside the headline
and the forward spring form a lateral pulling arm while the stern line and the
aft spring form the other lateral pulling arm.
The headline and the aft spring being in the same
direction do not allow the vessel to move aft, while the stern line and the
forward spring do not allow the ship to move ahead.
And while all the lines are tight the vessel stays
alongside.
Safety measures to be taken when handling mooring ropes and wires
Mooring lines are made of synthetic material and thus
have a lot of inherent elasticity. Also the line when taken on the barrels at 4
to 6 turns may often slip and get heat damaged.
While heaving it is best to take a few extra turns and
then to stand clear of the rope and the barrel, since the rope often jumps out
of the barrels with devastating effect.
Never stand in the bight of a rope. During mooring stations with many ropes being handles simultaneously it sometime becomes difficult to figure out which rope is moving.
Never wear gloves when handling mooring ropes. These
may get caught in the turns and endanger the hand.
Always hold ropes being heaved from the underside with
the palm facing upwards. In case the rope jumps the hand would not come in the
way.
Wires
Always wear leather gloves – certified for handling
wire ropes.
Stay clear of all wires, these are not flaked.
During inspection check the condition of the wires.
While paying out the rope has a tendency to slow down
and speed up as the weight comes in.
Wires do not have much elasticity.
Do not cross a rope from the top always go under a
rope.
Do not pass ropes and wires from the same lead.
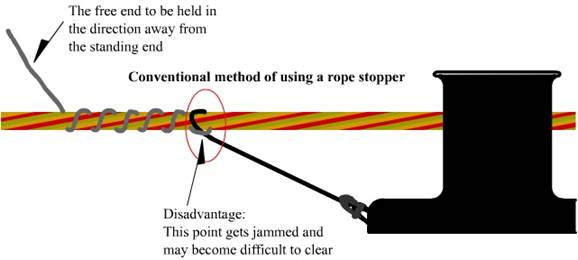
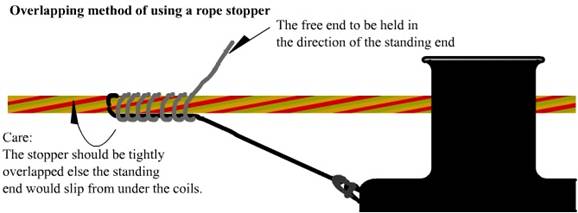
Taking a stopper on a rope
Making fast a mooring rope to bitts

Propeller
Clearance
The propeller area should always be kept clear of all
unwanted boats, floating ropes/ hawsers etc. A board stating ‘ Beware of
turning propellers’ should be fixed on either side of the poop deck railings.
Propellers are turned either to try out Main engines
on air and fuel or on turning gear.
In either case the danger lies in:
Personal hazard to people in
country boats and other wise.
Hazard to the shaft
connecting to the propeller that it may be fouled by a rope or such.
Ropes fouling a propeller are a serious incident since
it may lead to stern cooling oil leakage and barring the resultant oil
pollution, the cooling would be hampered. A fouled rope can only be cleared by
divers and thus is an expensive exercise – even if there is no damage to the
gland of the shaft.
In general, once a clearance is required by the Engine
room watch keeper, a responsible person with a communication unit should be
posted aft to see that the propeller is clear and he is not to leave stations
until the clearance is received from the Engine Room watch keeper. During the
entire operation the duty officer is to be kept apprised of the requirement of
propeller clearance and it should be included oin the
handing over and taking over responsibilities.
Again while on mooring stations, it is imperative to
inform the Bridge as to when the propeller is not clear (prior sending lines or
recovering them).
While berthing and unberthing
the propeller will be turned quite often, the duty officer attending aft
stations should prepare the lines for the tugs as well as the mooring lines so
that they may be sent out at the shortest possible time.
Making fast
tugs
There are two basic methods of tying up a tug.
Making fast the tug with
ships line.
In this the ship lowers the eye to the water line or
as required by the tug master (generally 2-3 metres above the water line). The
ship passes the rope after passing the rope through the bitt
(with a half turn- so that when the tug backs off prior tying up the rope does
not run out uncontrollably) where the plan is to make fast. The tug comes in
slowly and picks up the eye and puts it on the swivel hook. The tug then slowly
moves away from the ship taking in the slack, which is paid out by the ship.
Once the tug has enough rope she signals to make fast and the ship makes the
rope fast on the bitts. The ship then signals that the tug line is fast. The
tug initially stretches the rope and any slack in the turns on the bits now
pays out.
Care should be taken to see that nobody is in the
bight if there is one on the rope, also all should stand well clear of the bitt from where the rope is being paid out by an
experienced seaman.
Once the signal is to make fast, another hand woukld help in tying to the bitts with other men easing out
the coil from the stow position. A crowd should not be at the bitts.
Another method is a modification of the above. In this
case the tug asks for a heaving line to be thrown at the tug – attached to the
mooring rope. Once the eye is fast on the tug the operation is similar to
above.
Making fast
the tug with Tugs line
In this case the ship sends a heaving line attached to
a messenger line (24mm polyprop rope). The tug
attaches the tugs line to the messenger line. The ship heaves in the messenger
line on the winch. Care to be taken to see that the messenger line lead to the
winch passes across a bitt where the tugs line is to
be fast.
Once the eye of the tugs line comes on board, the
heaving is paused and a stopper is taken in the thugs
line below the eye.
The eye of the tugs line should be clear when the
stopper is taken on the tugs line, once the stopper has been rigged, the
messenger line is slackened gently and the weight shifted to the stopper.
The eye of the tugs line is quickly put on the bitts.
Making fast
to a buoy
Old method:
A messenger rope was tied to the mooring rope and the
messenger rope was sent to the buoy with the help of a heaving line or jolly
boat (boat with oars). The messenger line was taken through the eye of the buoy
and passed back to the ship. The ship put the messenger rope on the winch
barrel and heaved up on the same. The mooring rope was paid out and was kept
slack so that not too much weight came on the messenger rope.
Finally the eye of the mooring rope was at the buoy
where it was fastened or sent back on board through he
eye of the buoy to be fast on the ship.
In either case after the mooring rope was fast the
weight was taken on the mooring rope. The messenger rope
having been cast off and put to some other use.
Today:
Most buoy ports have a power boat which takes the
mooring rope lowered to the water level, it also takes some amount of rope on
the boat as slack, it then proceeds to the buoy the
ship paying out the slack.
Once the buoy people signal to heave up then only the
mooring rope is tightened.
Chain:
The ships chain is very rarely used for making fast to
a buoy these days. However in the River Hughli it was
quite common until the 70’s. A chain fasting barge used to come under the bows
or stern. And the chain was lowered on to the barge. The barge then proceeded
to the buoy, the ship paying out on the chain, keeping it just up and down. Too
much slack would cause a pile up under the ship, this was to be avoided.
Once at the buoy the mooring crew would make fast the
chain to the buoy and then signal to heave up, the slack was picked up under
the direct command of the pilot/ mooring master.
The day prior lowering the chain the anchor was
lowered out of the hawse pipe and lashed between the hawse pipe and the bow
stopper and the chain was cut at the joining shackle and the chain without the
anchor was lowered to the water level.
The entire process of making fast to the buoy would
take anything from 4-6 hours. This was a common practice on days when a bore
tide was expected. The stern had coir rope springs attached to blocks specially
brought from shore for this purpose.
Singling up
Once the command is received to single up – generally
the number of lines would be specified – if nothing is mentioned then it should
be clarified. Generally the departure meeting would have sorted out this.
The singling up should start from the weakest lines
being cast off first (these lines would not have been the first lines while
berthing). The other lines that are cast off are the lines left on the winch
barrels (due to paucity of bitts).
The last headline that would be held on to should be a
good one and have a good lead from the fairlead to the winch barrel – it should
preferably be on the side opposite to the side on which the spring has been
made fast.
This ensures that the station can pick up both the
spring as well as the head line after casting off together and not too much
time is lost – as will happen if one line is picked by one after the other.
The spring or other line that has been held on to
should similarly a good one and should have a good lead.
Note for both the lines adequate length should be kept
in readiness since sometimes the lines have to be paid out, thus the headline
and spring free ends should not be submerged under other lines when they are
picked up.
From the buoys:
Here too the same precautions are valid. Here a tug will
be fast to pull out the ship and in the absence of spring the headline and the
tugs line should be on opposite sides to facilitate the picking up of both
simultaneously.
Again the last line should have adequate spare length
to slack away prior casting off.
Casting off
a rope
Slipping a wire rope – generally for a tug is one of
the most dangerous actions and numerous cases have occurred where people have
been hurt.
Once the tug or other line has been slackened until it
is up and down in the water. A messenger is rigged to the winch barrel and the
end of the messenger is used to take a stopper on the wire.
Care the lead of the messenger should follow the way
of the wire as it has been fastened on the bitts.
Once the stopper (conventional) has been taken the
messenger is heaved up with the wire. As the wire becomes slack on the bitt, a second normal rope stopper is fastened and a couple
of hands are sent to slip it over the bitts. Once all is clear the messenger
rope stopper is gently slackened until all the weight is on the short stopper
and the messenger rope stopper is removed. When finally the
short stopper is cast off.
Many ships take a short cut and do away with the short
stopper and rely on the messenger rope stopper, but in this there is a danger
of the messenger rope slashing back after the wire rope is cast off from it.
This may injure someone.
Stowage of
ropes
The mooring ropes when they are taken in on board are
wet. As such it is not advisable to stow them under deck unless the weather
predicted is very rough.
For short voyages:
The mooring ropes are stowed on deck, on wooden
gratings. The ropes are neatly coiled, the coil starting with the end of the
rope kept clear of the grating and then coiling from a tight small circle and
then expanding to the edge of the grating. Once the edge is reached, the rope
is coiled inwards towards the centre and then again as the inside coil is
reached it is moved outwards. Finally the free end of the rope is put on the bitt.
A stout piece of rope (24 mm) is then used to lash the
rope coil to the grating. The grating being fixed to the deck
or lashed independently.
For long voyages:
A day after the mooring ropes were stowed on deck the
ropes are sent below deck, where the system of grating is the same as on deck.
Only the ends of the ropes are tied together with a
piece of rope to facilitate a continuous length of rope to be taken down as
well as taken up. Generally the stoppers are utilized for the tying up.
Thus the stoppers are also cared for by not leaving
them on deck.
For ropes stowed on winches:
After the rope has been reeved in the free eye is put
on a bitt. Once draining is done the rope is covered
by a adequate size of canvas (usually after 24hrs) the
canvas is tied down.
For wires:
The wire after being reeved in is allowed to drain.
Once draining is complete the wire is covered by a canvas cover.
Prior putting the canvas cover the top layers are
generally oiled with some excess oil/ grease, this ensures that if the wire is
not going to be greased during the voyage the oil would seep down to the other
layers.
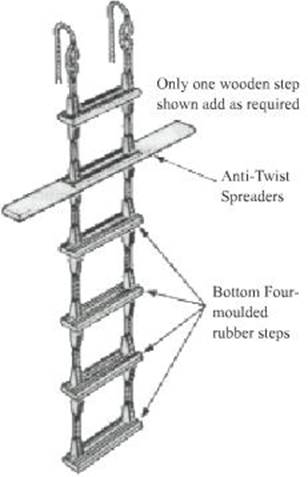
Pilot Ladders
This is a portable ‘roll-up’ ladder that can be hung
over the ship’s side for embarking and disembarking of the pilot and others
when the weather turns too choppy for the accommodation ladder to be used.
The ladder when rigged should terminate 300mm above the surface of the water in calm conditions. The pilot ladder is constructed of serrated; non-slip treads with side ropes threaded through their ends. The bottom four treads are made of moulded rubber and the remainder from hardwood; winnets (chocks) are seized between the two parts of each side rope to keep the treads in position. 3m x 20mm polypropylene securing lanyards are spliced to thimble eyes at the inboard end of the ladder, the ladder should be secured by shackling the thimble eyes direct to suitable strong points in the ship. To prevent the ladder twisting, 1.8m anti-twist spreaders with an integral serrated tread are fitted to the ladder at regular intervals, depending on the length of the ladder,
Total number of treads in ladder Position
of spreader
6-13 As the 5th tread
14 As
the 5th and 12th tread
15 As
the 5th and 13th tread
16-22 As the 5th and 14th tread
23 As
the 5th, 14th and 21st tread
24 As
the 5th, 14th and 22nd tread
25-30 As the 5th, 14th and 23rd
tread
While embarking a pilot, two 24mm manila or staple
spun polypropylene manropes must be provided.
They must be securely hitched to the handhold stanchions or other
suitably positioned fixtures and should extend for the length of the ladder,
terminating with a manrope knot in the end of the rope.
Pilot ladders are crucial equipment for embarking and
disembarking the pilot, and should as far as possible be not used for anything
else.
The pilot ladder is first to be inspected for any wear
and tear especially if any of the chocks are loose.
Once that is over the ladder is lowered over the side
to the desired level. The end ropes of the pilot ladder are now passed through
the lugs welded on deck and are a clove hitch is made over the step ropes in
such a way that a chock would take the weight. The free end is brought to the
lug on deck and a clove hitch is again made there. This is repeated for both
the side ropes of the ladder.
The stanchions are then fixed on to the gunwale and
the man ropes hung out.
Lighting is important and if the ship is not provided
with a permanent fixture then a cargo light (portable) has to be hung over the
side with the light falling on the ladder.
The equipment at the ladder site should include the
following:
Life buoy with a SI light
If the pilot ladder station is not fitted with a fixed
lighting system then portable cargo lights are to be hung overside.
Gant line
Heaving line
A canvas bag
A safety harness
A life jacket
The rigging of the pilot ladder is to be supervised by a responsible officer (with communication unit), who is to check that all the requirements as to the above noted points are covered and if any extra precautions are required as per the pilot’s instructions or the Masters instructions.
Fendering
A ship going alongside another ship or a jetty
requires a strong crushable fender to absorb any impact, but the fender must be
sufficiently unyielding to provide protection and sufficient separation to
allow for any overhanging structures, etc.
For boats and other small craft whose sides are strong in comparison
with the weight of the vessel, fendering presents no difficulties and any soft
fender is adequate. For larger vessels
fendering must be sufficiently robust to withstand the crushing of the weight
of the ship, and it must be large enough and sufficiently resilient to spread
and absorb the shock over a large area of comparatively weak hull plating. Fenders must be placed where the hull can
best withstand the impact; to some extent this applies to all ships, but in
modem ships they must be placed at specified positions where the hull is
strengthened by additional stiffeners near the waterline; tally plates (often
stenciled) on the weather deck show the limit of the stiffening. The fenders described below are divided into
three categories, those that are - fixed to the structure or jetty of a pier,
those that are mobile and provided in port (too heavy for ships) and those that
are portable (carried in ships).
Fixed Fendering. The solid walls of berths and the piles of
jetties have vertical logs of timber attached to protect the masonry/ concrete
and to provide fendering to ships alongside.
In some ports no other form of rendering is provided, but the use of
suspended rubber units is increasing. In
a tidal port, to lessen the impact when a ship is brought alongside, some
springing device is included between the timber and the masonry.
Port Fenders.
Catamaran. This is a stoutly constructed
rectangular wooden or steel raft used in dockyards between ship and jetty. The bearing surfaces are usually fitted with
rubber rubbing pieces.
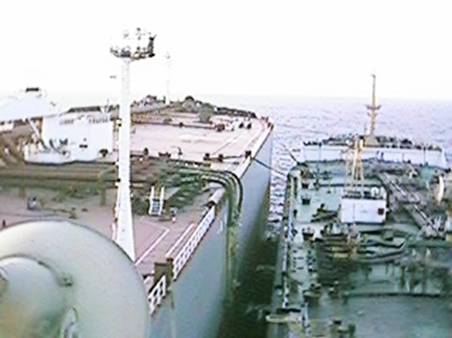
Large Pneumatic Fenders. These are increasingly being used instead of others for ships
lying alongside a dock wall or other ships, although they are not suitable for
use on piled jetties unless the area on which they will bear has first been
sheeted over with steel plate or similar Material to ensure the load is
spread. The fenders are manufactured
from textile reinforced rubber, and there are two types in use, the low
pressure type with a diameter of 2.3m and a length of 12m, Pattern number, and
the high pressure type, produced in various sizes, obtainable only by local
purchase. They also known as Yokohama Fenders and are seen mostly during STS
operations between tankers.
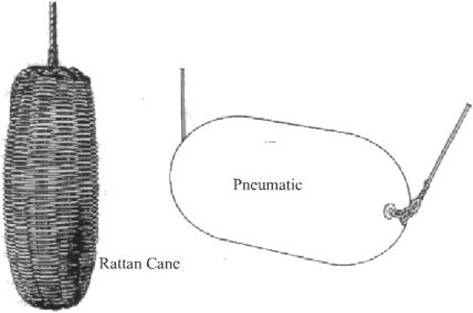
Portable Fenders
Rattan Fenders are made of rattan cane. They are light, clean and suitable for coming
alongside when other fenders are not available.
Two sizes are available, 1.2 x 0.5m, and 0.6m x 0.3m.
Portable Pneumatic Fenders. There is now an assortment of easily portable
pneumatic fenders available. They are ideal for light-hulled ships lying
alongside a dock wall or other ships but they must not be used when going
alongside unless great care is taken
The most common sizes in use are 0.96 x 2.2m, and
0.64m x 1.2m.
Other homemade fenders include fenders made from
wooden logs served with cordage and passed through a number of old motor
tyres. A wire lanyard is fitted to each
end so that the fender can be slung horizontally. It is a durable fender, but very heavy.
Old motor tyres, timbers are all suitable materials for making jury fenders.